Category: Programming

  • Telegram Chat Bot – PHP Source Code

    Telegram Chat Bot – PHP Source Code

    • Part 1 – Project Details
    • Part 2 – Project Source Code in PHP

    Introducing our simple programmable AI “artificial intelligent” auto reply bot. This chat bot will surely attend your business inquiries. It will increase the operation productivity and sales that helps your business growth. The chat bot will simply drive the customer into a dialog flow conversation with very effective neuro linguistic programing way to give what customers want.

    Greetings

    We make the greetings is one of the most important part, getting started with the conversation with warm welcome and acknowledgement. We tell about the importance of this conversation to us and the advantage of getting in touch with us even if the customer is chatting with the bot.

    Standard Menu

    This will guide the customers for easy navigation. And our AI initiate the dialog flow to drive the customer to get the answers by suggesting a question. The customer can leave questions that doesn’t exits on our FAQ’s and forwarded to human support username or an email address.

    Example dialog tree from menu.

    Tree menu: main menu > products: product list > product one: description > option: buy or return > instruction how to buy.

    Menu

    • Start
    • Marketing
    • Products
      • Product One
          Here are the information and description of the product, we can also send the video teaser of this product. Do you want to buy now or return to menu?

        • Buy now
            You can visit our website or click the link below to add it to your cart.
        • Return to menu
      • Product Two
    • Inquiry

    Standard Menu
    Start
    Marketing
    Products
    Inquiry

    START
    Hi username,
    Welcome to our frequently asked question chat bot.
    Here is your support number: xxxxxx

    Our virtual assistant will serve our frequently asked questions for products and marketing plan.

    We hope to serve you well.

    Please select our option menu! START, MARKETING PLAN, PRODUCTS and INQUIRY

    MARKETING PLAN
    Hi username, If you wish to know about our plan, you can select at the button below.
    [Referral][Unilevel][Binary]
    The bot will reply the marketing details and video. Then ask again to check or select the other marketing plan.

    PRODUCTS
    Hi, username, here are the list of our products. You can click the link to know more about the products.

    Product One
    Product Two
    Product Three

    You can browse our product category
    [Supplement][Beverages][Others]
    The bot will reply the list of the products.

    When the user reply or select the product, the bot will reply the product information, videos and testimonials.
    Product Name – this product is proven and effective.
    Here is the short video about the product.
    Have some time to check our testimonial images and video.

    INQUIRY
    Hi username, here are top frequently asked question.
    How to order?
    How to join?
    Where is your office location?

    If you wish to send inquiry, please reply inquiry followed by your message.
    Example reply: inquiry, please guide me how to join, here is my contact number.

    Here how it works?

    Getting started and marketing responses.

    Response on products selection and inquiry


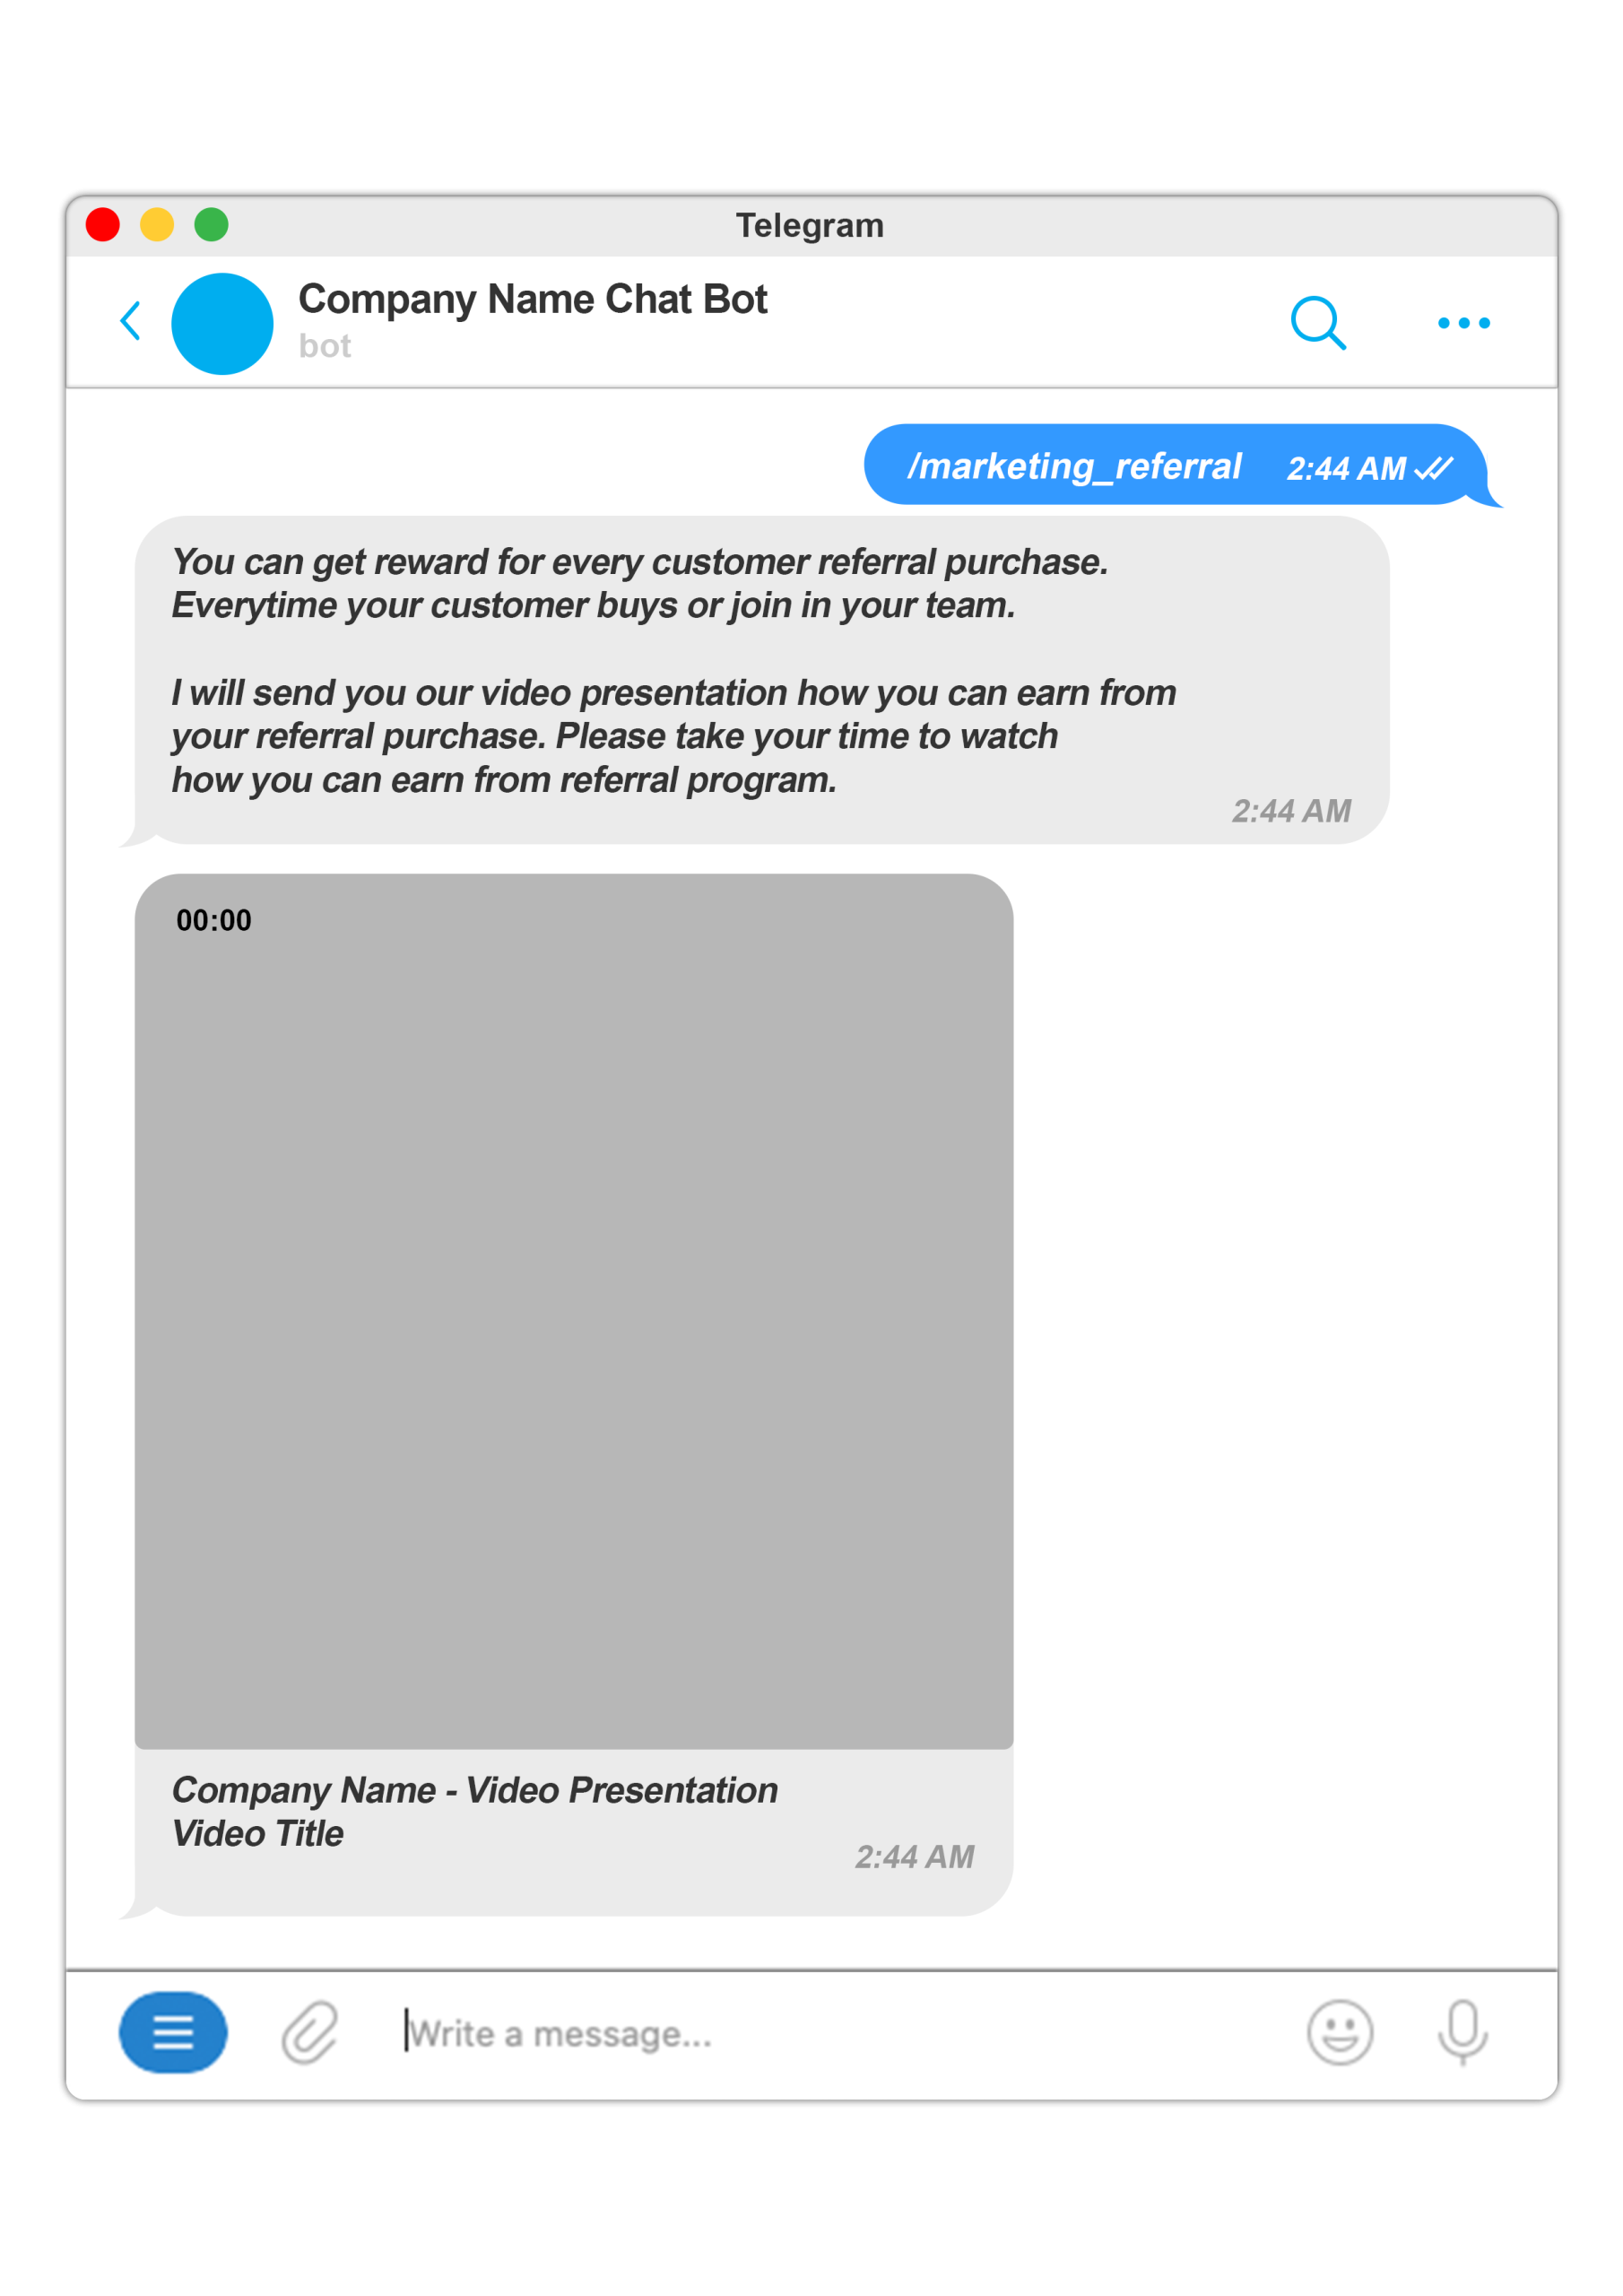
    Response on marketing referral with description and video.

    Response on products list, product description and call to action to buy products or return to main menu.

    Reponce on inquiry.

    These are the basic function of the bot. We can add more dialog flow conversation loaded on our bot dialog flow database.

    Additionally, we can add notifications if there is an update or special announcement.

  • How to update WordPress version, Themes and Plugin?

    Uploading or updating files on WordPress needs permission to read and write on the directory.
    This is how you can modify and change the ownership of the directory to the apache user.
    In this case my WordPress install on debian LAMP and we will run the command on terminal.

    sudo chown -R www-data:www-data /path/of/wordpress

    Don’t forget to give update file permission by

    sudo chmod -R 640 /path/of/wordpress

    Use the value of 640 to make the owner of the file read and write. Avoid the 777 permission where it allows anyone to access your files.

  • How to delete ._ file on mac?

    I got this ._ file name after extracting zip file on directory. In my case it was automatically created after unzipping. Here is how I delete that unwanted files.

    On your mac terminal run the command:

    dot_clean /Volumes/directory/path

    I always wanted to delete this in linux way and you can still perform this on your mac terminal.

    Step One: browse on the directory where the ._ file name using the command:

    cd /Volume/path

    Step Two A: When you are in the directory that you want to delete all the files with name ._, just run the command:

    find . -name '._*' -type f -delete

    Step Two B: If you want do delete file recursively.

    find . -type d | xargs dot_clean -m

    find . -type d – will go to each directory recursively and xargs dot_clean -m will perform delete.

    That how easy it is to delete ._ files on your mac

  • How to update wordpress version, themes and plugins on XAMPP VM?

    When trying to update plugins, themes or wordpress version it leads you to ftp informations for the reason that your wordpress don’t have credentials or access to the system files and folders.

    To solve my problem I go to xampp-vm “open terminal” where I do some terminal command.

    I simply update the user group of the wordpress folder same on the http.conf settings.
    You can look for these value.

    <ifmodule unixd_module>
    User daemon
    Group daemon
    </ifmodule>

    At the terminal command, change the owner of the folder with this command.

    sudo chown -Rf daemon.daemon /path/of/wordpress

    Do not forget to restart your Apache to make your changes take effects.

    It works for me and I hope it helps you too.You can also try the old version of doing this and the other way around is that you change the httpd.config settings to the present user admin. check this tutorial How To Update Your WordPress On XAMPP Running On Mac OSX?

  • How to print triangle shape asterisk using for loop?

    How to print triangle shape asterisk using for loop?

    This is my first exercises on computer programming 2. To triangle shape asterisk or echo out triangle asterisk in a for loop sequence.

    ----*
    ---***
    --*****
    -*******
    *********

    Analyzing the output?

    It could be 5 line break and so on
    The number sequence of the asterisk is x = x+2

    Here is the code for the number sequence.

    $s=""; // initial variable
    $b=9; // base number of the triangle
    // execute loop if true
    for($i=1;$i&lt; =$b;$i+=2){
    // make a line break
    $s.=$i."
    ";
    }
    echo $s;

    The output number sequences we get from the for loop

    1
    3
    5
    7
    9

    We already got the number of asterisk on each row.
    Now we can print the asterisk accordingly.

    $s=""; // initial variable
    $b=9; // base number of the triangle
    // execute loop if true
    for($i=1;$i&lt; =$b;$i+=2){
    // store the string value of $s while the asterisk count is true
    for($j=0;$j&lt;$i;$j++){
    $s .="*";
    }
    // make a line break
    $s.=$i."
    ";
    }
    echo $s;

    The output of triangle asterisk using for loop.

    *
    ***
    *****
    *******
    *********

    We add dash to indent the asterisk to center for the final code.

    $s=""; // initial variable
    $b=9; // base number of the triangle
    // execute loop if true
    for($i=1;$i&lt; =$b;$i+=2){
    // store and add dash on the string value of $s while it is true
    // or $k is less than $b-$i
    for ($k=0;$k&lt;($b-$i); $k+=2){
    $s .="-";
    }
    // store the string value of $s while the asterisk count is true
    // or $j less than $i
    for($j=0;$j&lt;$i;$j++){
    $s .="*";
    }
    // make a line break
    $s.=$i."
    ";
    }
    echo $s;

    The output of triangle asterisk using for loop with indention.

    ----*
    ---***
    --*****
    -*******
    *********
  • Clear the local DNS Cache in OSX 10.10 Yosemite, Linux and Windows

    Clear the local DNS Cache in OSX 10.10 Yosemite, Linux and Windows

    When you see something wrong on your website, like getting worry if server not found or the site isn’t loading the way it is. This is happening when Domain Name Server is changed or by connecting into network that has DNS management system. It is time to clear your DNS Cache.

    The DNS store domain and IP address on your local network cached and you can refresh it by flushing the cache.

    How to clear the local DNS cache on terminal or command line?

    OSX 10.10

    sudo discoveryutil udnsflushcaches

    OSX 10.9

    dscacheutil -flushcache; sudo killall -HUP mDNSResponder

    OSX 10.7 – 10.8

    sudo killall -HUP mDNSResponder

    OSX 10.5 – 10.6

    sudo dscacheutil -flushcache

    Windows

    ipconfig /flushdns

    Linux (depending on what you’re running)

    /etc/init.d/named restart
    /etc/init.d/nscd restart

    DNS cache is periodically flushing but it depends on how it is configure in network settings. You can use this command if you want to flush it now!

    I experience this when I transfer hosting and the dns change, while my local dns cache are still having the old data, it could load the page or the url can’t be resolve. I have to ask my chat make to check if the website is online and yes it was. So its time to flush my local dns to resolve the url.

    You can also flush dns in this kind of errors!

    Error 1001 Ray ID: 1d74987af9ca122b • 2015-04-15 03:35:50 UTC

    DNS resolution error

    What happened?

    You’ve requested a page on a website (www.yourwebsite.com) that is on the CloudFlare network. CloudFlare is currently unable to resolve your requested domain (www.advanceidea.org). There are two potential causes of this:

    • Most likely: if the owner just signed up for CloudFlare it can take a few minutes for the website’s information to be distributed to our global network.
    • Less likely: something is wrong with this site’s configuration. Usually this happens when accounts have been signed up with a partner organization (e.g., a hosting provider) and the provider’s DNS fails.

    DNS Error Resolution

  • How to update your WordPress on XAMPP running on Mac OSX?

    You might have been frustrated on updating your WordPress by entering FTP information that doesn’t work. The real problem here is the system credential on the Apache httpd.conf must be correct. The default user information on the httpd.conf on the line is:

    User nobody
    Group nogroup

    This line must be change to:

    User admin username
    Group staff

    This will allow the file permission to write on the disk and can update your WordPress automatically. Having the correct admin user on the httpd.conf configuration will make the WordPress installation and update to run without asking the FTP information.

    You may find the file to edit on this directory /Applications/XAMPP/etc/httpd.conf

    Edit the file on your favorite text editor and update it. Save the file and restart XAMPP Apache server and check if it is working.

    WordPress permission must be set.

    The permission must be set in order to run update. You might also need to change the folder rights of the users to make it writable. An update cannot be process if the folder is not writable or the user has no rights.

    Enjoy your WordPress Update

    You can now update your WordPress on your dashboard and it will go to the process.

  • How to add email account on Mac Outlook 2013 for Non-Secure Connection?

    How to add email account on Mac Outlook 2013 for Non-Secure Connection?

    I will give you example how to add email account on your Mac Outlook 2013. This connection does not require extra certificate authentication from the server. It will connect with the basic authentication with your given username and password.

    Here are step-by-step screen shot guidelines how to add email account on Mac Outlook 2013 version.

    Assuming that you have the given information. Your web admin or email hosting provider usually provides it.

    Email: [email protected]
    Password: ******
    Connection Type: IMAP or POP3, I recommend IMAP for better synchronizing.
    Incoming Mail Server: mail.yourdomain.com
    Incoming Mail Server Port: 143
    Outgoing Mail Server: mail.yourdomain.com
    Outgoing Mail Server Port: 25

    Step One: Click on Tools and Accounts
    Step Two: Click + symbol on the Bottom left corner and click Other Emails
    Step Three: Enter your email address and password.
    Step Four: Continue to fill up the mail server information and click Add Account

    Your email address is completely setup once you see the account appear on the left box. You can now close the dialog box and let your email synchronize and it is now ready to use.

    Follow the Snap shots images for visual aids.


    how to add email account on outlook mac 2013
    how to add email account on outlook mac 2013